Publications
 Partners


YOU WILL NEED
For one chair
For one table
TO MAKE
Before you start
Saw all the poles to the correct lengths with a jigsaw or handsaw. Drill 3mm pilot holes for the screws to prevent the poles from splitting.
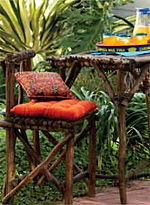
Chair
1 Place one back leg and one front leg parallel to each other and 450mm apart on a flat surface, with the bottoms of the poles at the same level. Screw one of the side cross pieces diagonally onto the legs: one end of the cross piece screwed to the top of the front leg and the other end to the bottom of the back leg. Turn the whole construction over and screw another cross piece to the legs in the same way as before to form a supportive
cross between the legs. Screw a rail piece between the front and back legs to form the support for the seat. Repeat the process to form the other side of
the chair.
2 Screw the two sides together with rails at the bottom between the front and back legs. Strengthen the structure by screwing another supportive cross between the two back legs.
3 Lay the poles for the seat onto the structure and screw the two outside poles to the rail pieces. Tie the other poles in place with rope and ensure that they are sturdy.
4 Tie the poles for the backrest to the top of the back legs with rope.
Table
1 Lay two of the table legs parallel to each other and 600mm apart on a flat surface. Place a short side piece on top of the two legs and screw them
together. For additional support, screw short brace pieces in the corners to the top and the side pieces. Repeat this step to form the other side of the table.
2 Screw the long side pieces to the sides (also with braces), to form the basic structure of the table.
3 Stand the table upright and screw the two long cross pieces between the legs to keep them sturdy.
4 Lay the poles for the table top onto the structure and screw the two outside poles to the structure. Tie the other poles in place with rope and ensure that they are sturdy.