Publications
 Partners


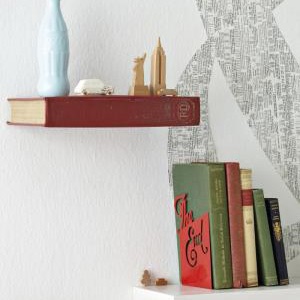
• small floating shelf (ours measures 190 x 200 x 30mm)
• old book (slightly larger than the shelf)
• G clamp or bench vice (or a very heavy object)
• Two small planks (roughly the same size as the books)
• wood glue
• paintbrush
• sharp craft knife
• metal ruler
• pencil
To make:
1 Place the floating shelf on the first page of the book so that the side of the plank where the screws go is flush with the open side of the book, then trace the outline with an allowance of about 1cm to ensure the shelf fits easily into the book.
2 Follow steps 1 to 6 of the secret-compartment book (below). If your book is thicker than the shelf, cut out as many pages as you need to ensure the book can close easily with the shelf inside.
3 Apply a generous amount of wood glue to all sides of the floating shelf, except the side where the screws go. Apply more wood glue to the first and last pages so they stick to the front and back covers. Insert the shelf into the cavity, close the book and clamp securely between two small planks, then leave to dry.
4 Remove the clamps and attach the shelf to the wall as per the instructions for any floating shelf.
Secret-compartment book:
• old book with decorative cover
• Two sheets of cardboard
• G clamp or bench vice (or a very heavy object)
• Two small planks (roughly the same size as the book)
• wood glue
• paintbrush
• sharp craft knife
• metal ruler and pencil
To make:
1 Decide which page of the book you would like to use as your first page and which one you’d like to be the last. Insert a sheet of cardboard after the first page and before the last one, to use as your guides.
2 Clamp the book or place it under a very heavy object. You can put two small planks on either side of the book if you’re worried about damaging the cover.
3 Dilute some wood glue with water so it’s just runny enough to paint. Apply the diluted glue to all three sides of the book between the two sheets of cardboard. With the clamp in place, set aside to dry, then apply a second coat of glue and leave to dry again.
4 Remove the first cardboard guide and open the book at the page after the front page from step 1. Measure the size of the hole you want to cut away.
5 Start cutting and use a metal ruler to ensure a neat finish. Work as accurately as you can and make sure you cut each line neatly into the book. Remove each page as you cut it, before moving on to the next one.
6 Blow lightly over the book to get rid of any loose bits of paper. Paint more diluted wood glue over the inner edges where you’ve been cutting, then clamp securely and leave to dry.
Text and image: Ideas magazine