Publications
 Partners


You will need
- birch ply offcut
- clock template
- Woodoc Water-Borne FLOOR Clear Matt
- Woodoc Colours Blue and Full Moon
- mixing containers
- mixing sticks
- pencil
- jigsaw
- G-clamps
- sandpaper
- drill with 8mm wood drill bit
- clock mechanism
- clock hand in gold and seconds hand in red
- small white dot stickers
Here's how...
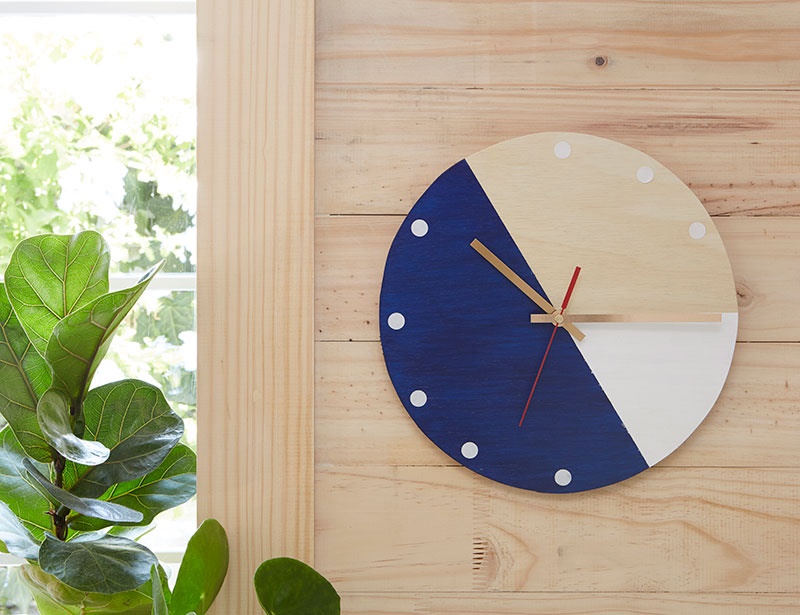
1 Download and print the clock template. Cut it out. Trace the template onto the wood. Mark the middle point.
2 Clamp the wood to your work surface and cut the circle out with the jigsaw. Drill a hole at the middle point of the circle then sand the edges smooth.
3 In two separate containers, mix about 75ml of Woodoc Water-Borne FLOOR Clear Matt with the Woodoc Colours Blue and Full Moon respectively.
4 Place the template back on the wooden circle and mark where 11 and 5 will be on the clock. Connect the marks with masking tape.
5 Paint the half circle with the Woodoc Colours Blue-mixture; apply two coats, letting the first layer dry before applying the next one. Remove the masking tape once the second coat has dried.
6 Now mask the area between 3 and 5 o’clock and paint with the Woodoc Colours Full Moon-mixture; apply two coats, letting the first layer dry before applying the next one. Remove the masking tape once the second coat has dried.
7 Seal the clock face with clear Woodoc Water-Borne Floor Matt; apply three coats, letting each layer dry before applying the next.
8 Use the template to mark where the hours are on the clock face and use the white dots to mark them out. You won’t need dots for 3, 4, 5 and 11 o’clock.
9 From the back, insert the clock mechanism through the hole in the middle and attach the clock hands.